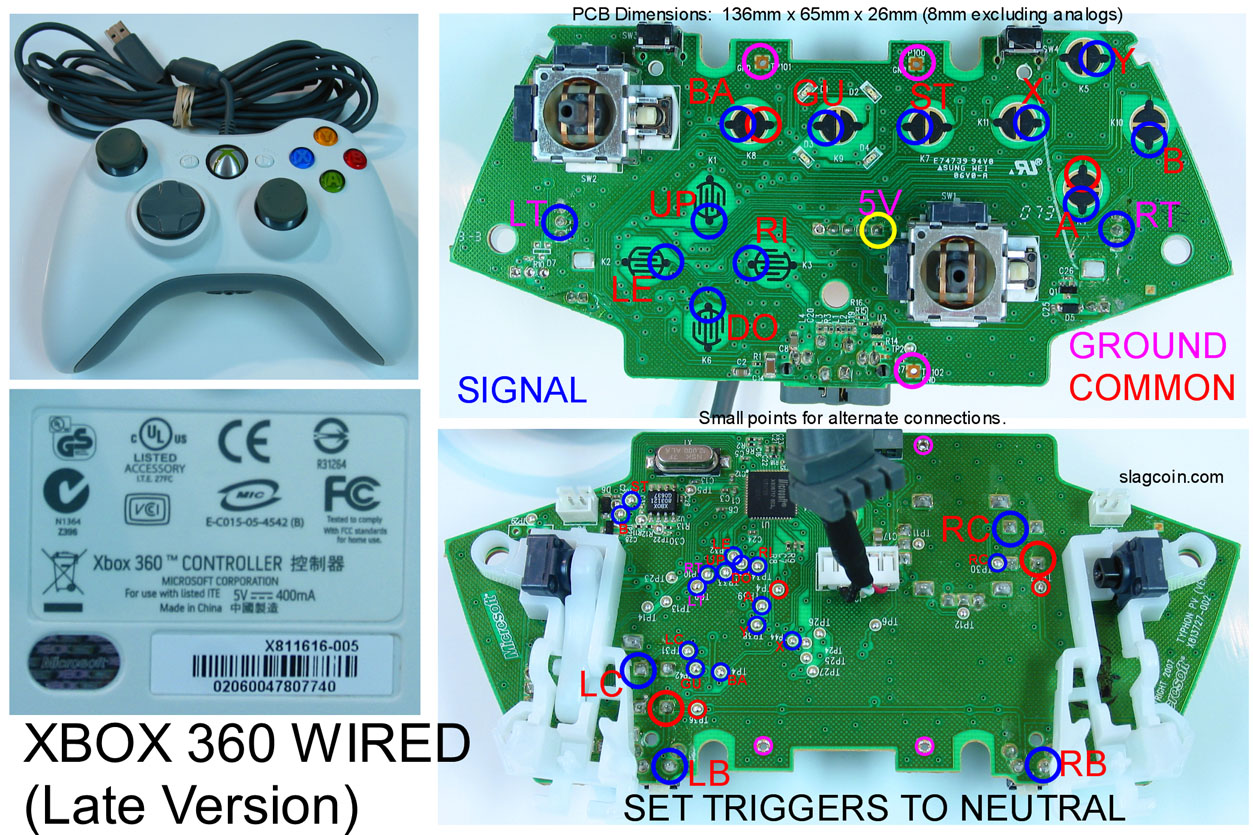
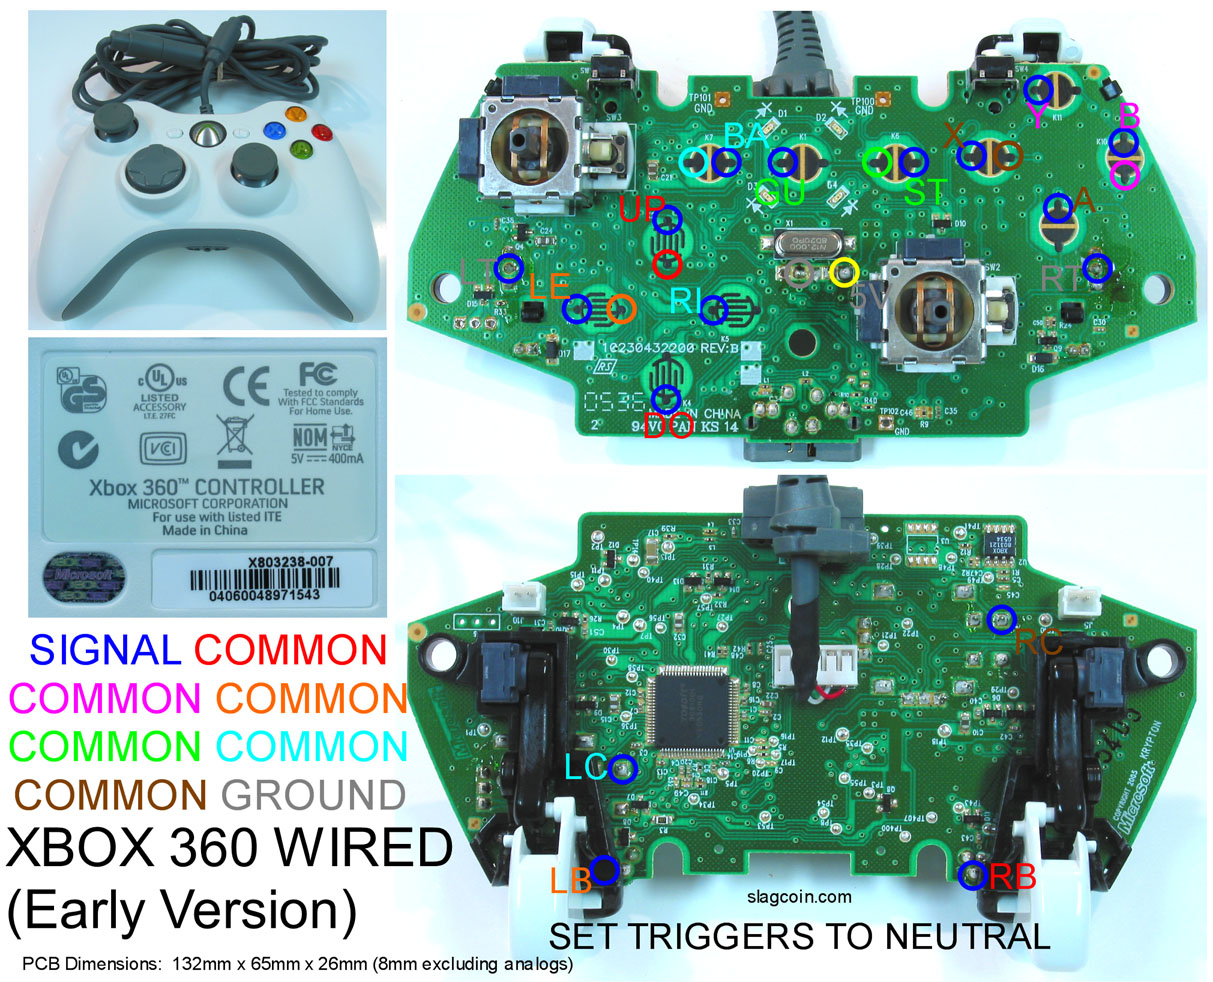
Tonight, I got a bug up my bum about staring on soldering some of my wires to the PCB board. First, I had to tear apart one of my 360 controllers (the wired one). That was hard enough, as I kept thinking that I was tearing apart $30. I grit my teeth and got through it though.
After that was done, I used a dremel to file away this black, rubberish coating that's on most of the contact points for the buttons. This, was mistake #1. I ended up exposing copper from nearby circuits and in some places ground away most of the copper at the points I needed to solder to. I tried to press through and solder what I could, and I made it all the way to the final signal point on the digital direciton pad...the one where I'd filed away too much copper. The solder had nothing to stick to, so I flipped the board over to find the point on the back. At this point, I realized I'd been referring to the wrong controller type. Based on the sticker, which had a MIC logo, I thought I had a late version when in fact, I had an early version . The sticker on the back looked like a late version sticker, and the analog triggers used white plastic for the mounts and lever arms...but the PCB defintely looked more like the images of the early version, which meant I'd wired pretty much everything incorrectly.
Long story short, one $30 controller later and I'm back to square one. Or square 3, since I still have the hardware and the wires set up with quick connects.
One thing those images don't do justice is scale. These PCBs are really small. And the copper circuitry on them is really pretty thin. It's very easy to grind away too much with a dremel and leave yourselve with nothing to solder to. Next time, I'll be using an exacto blade to carefully expose the metal.
Sunday, April 26, 2009
Tuesday, April 21, 2009
Decided to start doing a bit of wire setup tonight. I opened up all my new goodies, snipped some short lengths of black wire, and started tinning them to make all of my ground to ground connections (plan to wire these in a chain). After a half an hour I had a whole complete set of wires done. About 11 in total.
Then I realized that they weren't connected to each other in anyway. So the whole thing was a waste.
I tried snipping off the quick disconnect from one end of a couple of wires and twisting them together, but once I had tinned them they would no longer fit into the quick connects. So now I'm thinking that maybe the 24 gauge wire wasn't such a bad idea after all. If I'm going to be connecting 2 wires into each disconnect to make a single chain for all of my grounds, then the 24 gauge will probably fit better. But of course, I left that wire at work (still haven't returned it to Fry's.)
Was good soldering practice though. There were a few things that surprised me about the whole thing. First, the soldering iron took a lot longer to heat up than I expected. I thought I'd just plug it in and a minute or so later it'd be ready to go...but when I first put solder to it nothing much happened. I thought my iron was defective or that I'd gotten the wrong kind of solder at first, but eventually it came up to heat and the solder melted onto the tip of the iron very easily.
Secondly, I can't imagine doing this without the little helping hands/magnifying glass. One hand is holding the iron, one is holding the solder, leaving no hands to hold the wire.
Third, not sure what I'm doing wrong (or occasionally doing right), but some times when tinning the wires, they would heat up very quickly, and the solder would coat it after only a couple of seconds. Other times, I'd have to hold the soldering iron in contact with the wire for 10 or 15 seconds. I tried to keep a bit of solder on the end of the iron, as I had read that it transfers heat much better that way, but I'm not sure why it was so inconsistent.heat up and the solder would ooze right on to it. Maybe things will be quicker and more consistent with the thinner wire.
Wednesday, April 15, 2009
MaxScript
I've been playing around with MaxScript and learned how to create custom attributes via scripting. Max has a built in custom attribute editor, but it's very limited in functionality. It's really good for wiring parameters, but that's about it.
Through MaxScript you can embed pretty much any script functionality into an object as custom attributes, which means you can have pretty much any kind of scripted tools saved within the max scene itself. I've been going nuts with this, updating our rig, greatly simplifying it, and adding a number of tools to the control objects. Paul Neele's rigging tools are very helpful for doing this sort of thing.
There's one hiccup. I can't figure out how to set a value on a custom parameter outside of wiring or through a manipulator in a rollout. I've created a set of scripted buttons to align FK bones to IK bones and vice versa, but I can't figure out a way to set the swivel angle that's a custom parameter of the IK controller. I can use expose transform helpers to get the correct value...but I've hit a dead end with what to do with it.
On a completely unrelated note, my order from Willy's Electronics was shipped and should be arriving tomorrow.
Sunday, April 12, 2009
Quick Disconnects
Found a website that appears to have the quick disconnects I need in stock. Again, they're only sold in packs of 100, but the price is cheap enough that it really isn't that big of a deal. Who knows, I may build more controllers in the future. I also ordered 2 spools of 22 gauge "hook-up" wire. With shipping and sales tax (close to 10% now in CA), I'm in for another $25. I still have the wire and extra cutters to return to Fry's, so it may end up a wash.
If I'd had a bit more foreknowledge, I could have ordered these quick connects from Lizard Lick, avoided tax and shipping, and had the exact number I needed. If you're thinking about doing this sort of thing yourself, do yourself a favor and order the disconnects at the same time you order the arcade parts (assuming you can get them from the same source). I can't imagine any reason not to use these things, and unless you're planning on building multiple controllers buying 100 when you only need 8 can be a waste.
If I'd had a bit more foreknowledge, I could have ordered these quick connects from Lizard Lick, avoided tax and shipping, and had the exact number I needed. If you're thinking about doing this sort of thing yourself, do yourself a favor and order the disconnects at the same time you order the arcade parts (assuming you can get them from the same source). I can't imagine any reason not to use these things, and unless you're planning on building multiple controllers buying 100 when you only need 8 can be a waste.
Happy Easter!
It's Easter time. We celebrated Easter last year, but William was just a bit too young to really appreciate what was going on. This year, he's all over it.
I was struck with the sudden realization that I have complete control over what my son associates with Easter. If I want him to believe that we dye eggs to drive away the magical dinosaur from space, who is deathly afraid of dyed eggs, I can do that. It's a strange
I was struck with the sudden realization that I have complete control over what my son associates with Easter. If I want him to believe that we dye eggs to drive away the magical dinosaur from space, who is deathly afraid of dyed eggs, I can do that. It's a strange
Saturday, April 11, 2009
Rigs
I've been spending a lot of time at work lately massaging our rigs. For years, I've been looking for a way to deal with knee popping when using IK limbs and a few days ago I came across a very old forum post about how to set up 'soft IK' in 3DS Max using the Expose Transform helper, Lookat and Limit controllers, and some parameter wiring. After a few hours I had a working prototype and set about applying it to our rig.
Things worked beautifully, so I went ahead and added them our arms as well. I also wired the parameters that control the limit controller into the custom attribute modifier of our IK control objects.
I've also been working on a solution for having the neck bone share it's orientation between the chest and head bone (which doesn't inherit rotation). This is a bit tricky because everything's in a heiarchal chain, so there's a lot of dead-ends that lead to dependency loops. Ultimately the solution was to add a new control object for the hips, so that the chest and neck bone could be orientation constrained to it and then it's rotation controllers are wired to the head bone's rotation controllers with an 0.5 multiplier. This new controller also gives me the ability to rotate the entire upper body at once. Previously, the neck and upper arms don't inherit rotation from their parent, which means we can rotate the chest without affecting these limbs. It makes for a more natural workflow in most cases, until we try to fully rotate the character in place. Then these bones tend to flip around when they reach the limit of their quaternions.
I also wired a spline controller to our clavicles. These things have always been a pain in the ass to select to animate, as they're buried inside of both the skin geometry (so they can't be seen) and the chest bone (so they can't be selected).
And finally, I wired the screen manipulators that control our FK/IK blending for the arms and legs into the custom attribute modifier of the IK control objects themselves. The manipulators are in their own layer and a bit of a pain to work with, as you have to turn the 'manipulate' button on to change their values as well as hiding/unhiding the layer. It's amazing how 2 or 3 extra steps can really bog down your workflow.
Now my new goal is to figure out how to get some scripted tools working with our rigs.
- IK/FK pose snap - For quicker switching between the FK/IK limbs during an animation. Right now we have to manually align each bone when we switch between the two.
- Pose bank load/save - We've been using Anipose for finger poses, but I'd really like to build a pose bank for our whole character (both FK bones and IK controllers) to cover the basic stances we frequent chain into/out of.
- Pose copy/pasting with mirroring
Parts and Supplies
About another week later, my order finally arrived. Now that I had the components, I needed to figure out how how to build a box to house everything. So I started doing a more thorough search of the mod community and eventually found a reference to Slagcoin's Joystick Controller Page
Let me just say that if you have any interest whatsoever in making your own arcade stick controller, pay Slagcoin's page a visit. It is a wealth of information about every aspect of custom controller creation. It will literally tell and show you everything you need to know about how to make a controller from start to finish. I wish I had found this page before I ordered my parts, but even without it I didn't do to bad.
Armed with a treasure trove of new information, I put together a shopping list of things I was going to need to do the wiring and headed down to the nearest Fry's.
Fry's had a wide selection of Soldering Irons. I couldn't find any 15 watt irons, but I found 12 watt and 25 watt, so I opted for the 25 watt. I have no idea what this will mean for a novice, hopefully it won't be too much for me to handle. I also picked up some 0.32 diameter solder in a dispenser pack. This seemed like it would be easier for me to handle than the spools. Again, rosin core. Every website that I read up on stressed this. Acid-core solder wasn't appropriate for soldering on electronic components.
I found a pretty basic soldering station. This is a small stand with a coiled wire for holding the soldering iron and a sponge, which you wet and use to clean the tip of the iron. I also found a handy little 'helping hands' tool, which is a couple of articulated arms with alligator clips and a magnifying glass. I've been reading up on soldering and it seems it can be a bit awkward holding the wire, soldering iron, solder, and the PCB that you're soldering to. It was pretty inexpensive, so I snagged it.
Fry's had a small, battery powered hot-glue gun. Hot glue guns are always handy, and I've been meaning to pick one up, so this was just a perfect excuse. I've never used a battery powered one before, so we'll see how it works out.
I grabbed two small spools of 24 gauge, stranded, tinned copper wire. One black and one red.
After 20 minutes of scouring through their racks of quick connectors, I wasn't able to find the particular ones I needed. The switches on the joystick have 0.187" plugs while the switches on all of the buttons use 0.110" plugs. It doesn't seem like Fry's even stock 0.110 female quick disconnects (possibly a Japanese size?) and they were out of the 0.187".
I wasn't able to find a tool that could strip and crimp 24 gauge wire, so I ended up just getting simple stripper. I could have sworn I already had one of these from a few years ago when I installed our home theater system.
All together, I spent a bit under $50. Between this and the arcade parts, I'm already $90-$100 into this project. So the expensive, commercial built arcade sticks aren't looking like such a bad deal now.
After I got back home I jumped back on the internet and attempted to find the female quick disconnects I want. Having these things will mean that I don't have to solder wires directly to the switches on the buttons and joystick. It would make the whole thing a lot easier to put together. Unfortunately, these things are pretty hard to find right now. Lizard Licks sells them, but they're backed up until the end of April. I found other sources, but they only sell in bags of 100. As I only need 8 in 0.187" and 18 in 0.11", ordering 2 bags of 100 seems like a waste. I also noticed that most of these quick disconnects are made for 18-22 gauge wire, and I've got some concerns about them fitting the 24 gauge wire.
And of course I found the wire stripper/crimper that I had originally thought I had. It also only goes as small as 22 gauge wire. Since I'm going to have to return the stripper I bought, I might as well exchange the 24 gauge wire for the slightly thicker 22 gauge...just in case I can get my hands on some quick disconnects.
Let me just say that if you have any interest whatsoever in making your own arcade stick controller, pay Slagcoin's page a visit. It is a wealth of information about every aspect of custom controller creation. It will literally tell and show you everything you need to know about how to make a controller from start to finish. I wish I had found this page before I ordered my parts, but even without it I didn't do to bad.
Armed with a treasure trove of new information, I put together a shopping list of things I was going to need to do the wiring and headed down to the nearest Fry's.
- Soldering Iron - 15-25 Watt.
- Solder - Rosin Core (NOT acid core)
- Soldering Station
- Quick connectors
- Hot Glue Gun
- Wire - 22 to 26 gauge AWG
- Wire Stripper/Crimper
Fry's had a wide selection of Soldering Irons. I couldn't find any 15 watt irons, but I found 12 watt and 25 watt, so I opted for the 25 watt. I have no idea what this will mean for a novice, hopefully it won't be too much for me to handle. I also picked up some 0.32 diameter solder in a dispenser pack. This seemed like it would be easier for me to handle than the spools. Again, rosin core. Every website that I read up on stressed this. Acid-core solder wasn't appropriate for soldering on electronic components.
I found a pretty basic soldering station. This is a small stand with a coiled wire for holding the soldering iron and a sponge, which you wet and use to clean the tip of the iron. I also found a handy little 'helping hands' tool, which is a couple of articulated arms with alligator clips and a magnifying glass. I've been reading up on soldering and it seems it can be a bit awkward holding the wire, soldering iron, solder, and the PCB that you're soldering to. It was pretty inexpensive, so I snagged it.
Fry's had a small, battery powered hot-glue gun. Hot glue guns are always handy, and I've been meaning to pick one up, so this was just a perfect excuse. I've never used a battery powered one before, so we'll see how it works out.
I grabbed two small spools of 24 gauge, stranded, tinned copper wire. One black and one red.
After 20 minutes of scouring through their racks of quick connectors, I wasn't able to find the particular ones I needed. The switches on the joystick have 0.187" plugs while the switches on all of the buttons use 0.110" plugs. It doesn't seem like Fry's even stock 0.110 female quick disconnects (possibly a Japanese size?) and they were out of the 0.187".
I wasn't able to find a tool that could strip and crimp 24 gauge wire, so I ended up just getting simple stripper. I could have sworn I already had one of these from a few years ago when I installed our home theater system.
All together, I spent a bit under $50. Between this and the arcade parts, I'm already $90-$100 into this project. So the expensive, commercial built arcade sticks aren't looking like such a bad deal now.
After I got back home I jumped back on the internet and attempted to find the female quick disconnects I want. Having these things will mean that I don't have to solder wires directly to the switches on the buttons and joystick. It would make the whole thing a lot easier to put together. Unfortunately, these things are pretty hard to find right now. Lizard Licks sells them, but they're backed up until the end of April. I found other sources, but they only sell in bags of 100. As I only need 8 in 0.187" and 18 in 0.11", ordering 2 bags of 100 seems like a waste. I also noticed that most of these quick disconnects are made for 18-22 gauge wire, and I've got some concerns about them fitting the 24 gauge wire.
And of course I found the wire stripper/crimper that I had originally thought I had. It also only goes as small as 22 gauge wire. Since I'm going to have to return the stripper I bought, I might as well exchange the 24 gauge wire for the slightly thicker 22 gauge...just in case I can get my hands on some quick disconnects.
Arcade Stick Project
I picked up Street Fighter IV a couple of months ago and played the heck out of it. But I eventually got to the point where the XBox 360 controller just wasn't cutting it anymore. Some of the combos required some button presses that I was finding impossible to do. So I decided to buy an arcade stick.
I did a bit of shopping around at local stores and came up empty. Even online, there weren't a lot of options at the time. The commercial sticks were either really expensive, out of stock (not the only SFIV player apparently), not available yet, or received mediocre reviews. However, during my searching I also found a lot of photos of custom made arcade sticks built by various people in the console mod community. Some of these were really spectacular. Especially this one. I'm a sucker for LED backlit things. I was intrigued by the idea building a controller for myself and learning some new skills. Hopefully, mad skills.
I stopped searching for controllers to buy and started researching how to build one from scratch. How to tear apart a controller, where to wire buttons and joysticks to, even how to add LEDs to arcade buttons. I eventually cobbled together enough info to have a vague idea of the components I needed, and after a bit more quality time with Google I found an online dealer. Lizard Lick Amusements.
I placed an order for the arcade parts I was going to need:
I went with the Seimitsu buttons because they were highly regarded by the mod community. They also have a convex plunger top. For the 30mm buttons I went with have translucent bodies and plungers with an opaque white interior piece. Once these have LEDs in them, they'll have bright ring of light around the button. I ordered an assortment of colors to match the 360 controller color scheme. Red, Green, Orange, Blue, and two White. I plan to use these in a 6 button layout, so they'll function as the X, Y, B, A, and Left/Right Shoulder buttons.
The 24mm buttons are all slightly different from each other. Two are opaque with black bodies. One has a white plunger and the other black. I picked black and white as a throwback to the original XBox buttons. These will function as my Back and Start buttons.
The final button is similar to the 30mm buttons. Translucent body and plunger, with an opaque white interior. I plan to use this one as the XBox button. I'm kind of regretting the choice to do non matching buttons for the back and start now, but it would be easy enough to replace them later on.
I submitted the order and less than 10 minutes later received an email from PayPal letting me know the funds had been transferred. I patiently waited for my parts to arrive.
One week, went by.
Then two.
Still no parts. I checked Lizard Licks website and they had a large red message saying that their orders were backed up by about 3 weeks due to SFIV. (It's still up if you go look at it today)
Three weeks...four weeks.
Now I was starting to get a bit nervous. PayPal has a 45 day policy about contesting payments and as this was my first foray into homemade arcade making and first dealings with Lizard Lick, I was beginning to wonder if I'd fallen victim to some fly-by-night scam. So I sent a polite email to Lizard Lick, just to make sure they'd gotten my order and had all of the information they needed to ship it.
I had a response by the very next day saying that they did have my order, everything was fine, they were just backed up.
I did a bit of shopping around at local stores and came up empty. Even online, there weren't a lot of options at the time. The commercial sticks were either really expensive, out of stock (not the only SFIV player apparently), not available yet, or received mediocre reviews. However, during my searching I also found a lot of photos of custom made arcade sticks built by various people in the console mod community. Some of these were really spectacular. Especially this one. I'm a sucker for LED backlit things. I was intrigued by the idea building a controller for myself and learning some new skills. Hopefully, mad skills.
I stopped searching for controllers to buy and started researching how to build one from scratch. How to tear apart a controller, where to wire buttons and joysticks to, even how to add LEDs to arcade buttons. I eventually cobbled together enough info to have a vague idea of the components I needed, and after a bit more quality time with Google I found an online dealer. Lizard Lick Amusements.
I placed an order for the arcade parts I was going to need:
- 1 Happ 8-Way competition joystick
- 6 Seimitsu 30mm Pushbuttons
- 3 Seimitsu 24mm Pushbuttons
I went with the Seimitsu buttons because they were highly regarded by the mod community. They also have a convex plunger top. For the 30mm buttons I went with have translucent bodies and plungers with an opaque white interior piece. Once these have LEDs in them, they'll have bright ring of light around the button. I ordered an assortment of colors to match the 360 controller color scheme. Red, Green, Orange, Blue, and two White. I plan to use these in a 6 button layout, so they'll function as the X, Y, B, A, and Left/Right Shoulder buttons.
The 24mm buttons are all slightly different from each other. Two are opaque with black bodies. One has a white plunger and the other black. I picked black and white as a throwback to the original XBox buttons. These will function as my Back and Start buttons.
The final button is similar to the 30mm buttons. Translucent body and plunger, with an opaque white interior. I plan to use this one as the XBox button. I'm kind of regretting the choice to do non matching buttons for the back and start now, but it would be easy enough to replace them later on.
I submitted the order and less than 10 minutes later received an email from PayPal letting me know the funds had been transferred. I patiently waited for my parts to arrive.
One week, went by.
Then two.
Still no parts. I checked Lizard Licks website and they had a large red message saying that their orders were backed up by about 3 weeks due to SFIV. (It's still up if you go look at it today)
Three weeks...four weeks.
Now I was starting to get a bit nervous. PayPal has a 45 day policy about contesting payments and as this was my first foray into homemade arcade making and first dealings with Lizard Lick, I was beginning to wonder if I'd fallen victim to some fly-by-night scam. So I sent a polite email to Lizard Lick, just to make sure they'd gotten my order and had all of the information they needed to ship it.
I had a response by the very next day saying that they did have my order, everything was fine, they were just backed up.
Subscribe to:
Posts (Atom)
